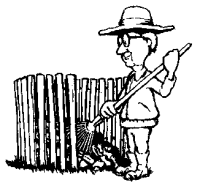
Setting up a backyard
composter
Choosing a site: for the best
results your compost bin should be positioned in an easily
accessible sunny or partly-sunny spot, on well drained soil.
The soil below the bin should be loosened to improve drainage
and increase access for worms and bacteria. It helps to
have room for a pile of dry leaves next to it. Place a
few inches of kitchen waste on the soil at the bottom of the
bin, this will attract worms and bacteria to the bin and
increase the rate of compost formation.
Size consideration: Your compost
structure or compost pile must be at least 7 cubic feet to
provide enough heat, air, and moisture for adequate
decomposition. How do you calculate the volume of your
composter? If it is 2 feet wide, 2 feet long and 3 feet
high, the volume is 2x2x3=12 cubic feet.
Making or purchasing a composter: Making
your own composter is as easy as
staking out 6' of chicken wire to form a vertical
tube, or, being very creative with scrap wood.
There are many websites on the web and books in our libraries
dedicated to building composters. Alternately, you can buy
a moulded plastic composter or fancy cedar one,
depending on your budget. They are available in Reno-Depot,
Rona, and most big garden supply stores.
Here are the most common types of composters:
| |
ADVANTAGES
| DISADVANTAGES
|
|
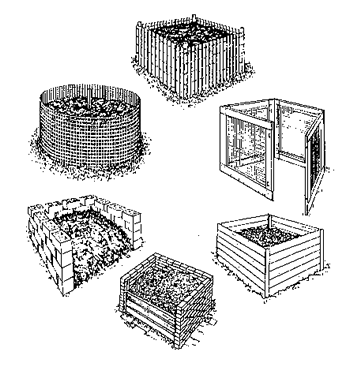
HOME-MADE ENCLOSURES from chicken
wire, snow fence, wood, screens, bricks,
etc. Lids can be made from framed screens, etc.
|
 Generally little or no cost with use of scrap material
 Enclosures from light material are easy to empty or relocate
 Custom-made means it may be easy to adapt to evolving needs
 Easy access to underlying soil for migration of beneficial worms and
micro-organisms
|
 Some materials (bricks, etc.) may be expensive
 Structures from heavy materials may be hard to
relocate
 Easy pest access unless lid also provided
 Manual aeration required
|
|
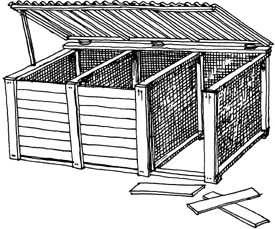
MULTI-COMPARTMENT COMPOSTER BINS. As one
bin is filled up, the next bin can be started, allowing
the previous one to age and finish
decomposing. By the time the last one is filled,
often the first one is ready to be used in your garden.
|
 Users can let older
compost "age" without mixing it with new
material
 Good for managing large quantities of compost
 Easy access to underlying soil for migration of
beneficial worms and micro-organisms
|
 Materials to build may be expensive
 May be labour- intensive to build
 Difficult to move
 Manual aeration required
|
|
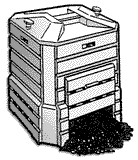
MOLDED PLASTIC COMPOSTERS with no bottom
|
 Fast set up
 Available in most hardware stores or nurseries
 Many different models and sizes are available
 Easy access to underlying soil for migration of
beneficial worms and micro-organisms
|
 More difficult to turn for aeration. Users may address this with a specialized
aerating tool
|
|
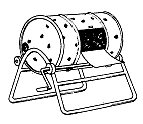
CYLINDRICAL TUMBLERS can be purchased or
built.
|
 No access by pests
 Easy to mix the compost materials
 Various models are available
 A cheap alternative can be constructed by
drilling drainage holes in a cylindrical garbage
bin with a lockable lid. It's tumbled by
"kicking it around the garden". A cheap alternative can be constructed by
drilling drainage holes in a cylindrical garbage
bin with a lockable lid. It's tumbled by
"kicking it around the garden".
|
 More expensive to purchase than a regular bin
 No contact with the ground to allow for migration of
beneficial worms and micro-organisms
|
|
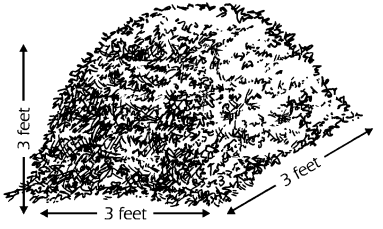
COMPOST PILES
|
 Simplest
 Easy to relocate
 Easy to access for aerating and adding new materials
 Easy access to underlying soil for migration of
beneficial worms and micro-organisms
|
 Easy access for pests who may dig out leftovers and make a mess
 New kitchen scraps need to be completely
covered in leaves, etc each time to minimize this
problem
 May be considered unsightly by neighbours
|
|
Filling a composter
What to put in a composter?
Everything that has been grown
naturally, with minimal or no pesticide use, can
be tossed into your composter as long as you get
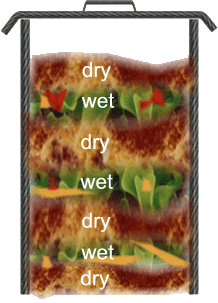
a balanced mixture of wet/green materials (1/4 -
1/2) to dry/brown materials (1/2 - 3/4).
Wet/green materials (such as vegetable
scraps or freshly-cut grass) are high in nitrogen, decompose
easily, and tend to rot if on their own. Dry/brown materials (such as dry leaves,
straw or wood chips) are high in carbon and decompose slowly if on their own.
Layering is the best approach
for quicker breakdown of organic waste to humus-rich
black soil.
|
|
Here are some common materials from your yard, kitchen, or around the house that can
be composted:
|
Optimizing the composting process
Left on their own, the green/wet and brown/dry
materials decompose very slowly. Adding them onto the
compost pile in successive thin layers is already a good start
at speeding up the decomposition process. You can
optimize the process further as follows:
-
Feed the compost with smaller particles
Large pieces of plant trimmings or vegetable scraps (broccoli stems,
cabbage hearts, etc) take longer to decompose than smaller ones. They can
also become entangled and make stirring problematic. Whenever possible
, chop up large pieces into smaller ones to speed up decomposition.
Dry leaves decompose faster if they are
mulched. Oak leaves with their tough surface decompose
particularly slowly, so those should be mulched to be composted. To
mulch leaves, drive over them with your mulching lawnmower a few times
before raking them up in the fall.
- Aerate/Stir the compost periodically
The primary purpose of aerating and turning
the compost pile is to increase oxygen flow for
the micro-organisms, and to blend un-decomposed materials into the
centre of the pile. Either a pitchfork or a specialized
aerating tool will do the trick. By stirring the compost, you'll also
ensure more even distribution of moisture. Aerate every 2-3 weeks, turn
the whole compost pile once or twice a
year.
- Watch the moisture level
If the compost is too wet, it tends to rot
and produce unpleasant smells. If it is too dry, the
micro-organisms responsible for decomposition will die out and
the composting can slow down. Add water or dry brown
materials to restore proper moisture level which is comparable
to a wrung-out sponge.
- Temper your expectations in the winter
The work of the micro-organisms in the compost
generates heat in the middle of the compost pile. Although larger
piles tend to produce more heat and therefore remain active longer into
the winter, the compost will eventually freeze solid in our Quebec
winters. The piles therefore stop "shrinking" until the
next thaw when the micro-organisms become active again. If you run
out of space in your regular compost container, a second container or
pile may tide you through the winter.
To make sure that you have enough dry material to last you the winter and the
following summer keep at least 2 - 3 bags of dry leaves (more if you produce
a lot of organic waste) in the fall for winter and summer composting.
- End with the brown
As you add fresh kitchen scraps onto your compost,
always cover them with a layer of brown (dry leaves, shredded paper,
straw, etc.) . Pests such as squirrels, crows or raccoons will be
less likely to come rummage around the pile, and the scraps will
decompose faster on the inside of the pile.
- Avoid these non-compostables
Never use rhubarb leaves or cedar chips in your
composter; their essential oils are too
strong and can kill off the friendly
microbes.
Peony foliage should not be added to the
compost pile because botrytis blight (also called gray
mold), a fungal disease that affects peonies, sometimes
survives the composting process.
- And for an extra boost..
Keep some of your
finished compost (humus) back to add to
the bin when you restart it. It's
full of composting microbes.
Manure (chicken, sheep, horse, most herbivores) is
a great addition to your compost, full of hard-working
micro-organisms which speed up the composting process. The herb Comfrey (Symphytum
officinale) occasionally mixed into your
compost bins acts as an accelerator.
Commercial accelerators are not necessary.
|
Trouble-shooting common
problems (smells, pests, etc.)
- My compost smells like rotten eggs.
When the content of your bin (the mix) is too
wet, decomposition slows down and odour increases.
This is because the mixture is lacking in oxygen.
Without oxygen, the bacteria and microbes that
decompose your scraps cannot do their work
effectively. Mix in a lot of dry leaves (shredded
newspapers, straw, ...) to bring the
compost material back to a balance between wet
and dry material. By mixing these compost
materials, air will be added, and the bad odour
should go away after two or three days, the
decomposition of materials will increase, and
your neighbours will be happy.
- My compost smells like ammonia.
You have added too much nitrogen rich material
(i.e. green material) -- add dry brown material
and mix.
- I've got fruit flies.
Keep fresh food scraps well covered with leaves or soil
- My compost is going grey on top.
Add water until it has a damp sponge-like consistency.
- Pests are invading my compost.
Sweet-smelling melon rinds and many other exposed kitchen scraps attract
raccoons and squirrels. Always cover your newly emptied kitchen scraps
with a lawyer of brown materials (dry leaves, straw, etc.) to prevent
odour. Have a tight-fitting lid on your compost bin or avoid using
particularly attractive ingredients for a while or dry them out before using them.
|
Vermicomposting
Vermicomposting is the process of using red
earthworms to turn our kitchen food waste into
highly nutritious humus for use on house plants,
lawns, shrubs and gardens. Worms, as one of
nature's crucial and efficient recyclers, can
produce nutrient-laden food which can then be
returned to nature and ensure a healthier planet.
Worm composting, which can be done all year
round, is ideally suited for both home and
apartment as the worm bin takes up very little
space. It can be located outdoors in summer
and indoors in winter and, with proper
maintenance, is odour-free. Approximately
every 3-4 months, worms and their castings (humus)
need to be separated and the worms placed in new
bedding so the cycle can repeat itself.
|
More information on
composting

For information online, check out our
compost-related links.
There many composting how-to books available at public libraries.
Some titles in the Beaconsfield library include:
- Let it rot! The gardener's
guide to composting by S. Campell
- The Rodale Book of Composting
- Worms eat my Garbage by Mary
Appelhof
- Les Vers: Des croyances populaires au
lombricompostage by Maurice Dumas
Also available from the Beaconsfield Library is a 10 minute video, produced by the manufacturers of The
Earth Machine composting bins, on the basics
of composting
|
